Exporting Builds & Shipping Patches
Your game runs great in the editor — time to put it in players' hands. Comet exports self-contained builds for Windows, Linux, Android and Web, packs your content into memory-mapped .ori archives, and — the killer feature — builds incremental patches that ship only what changed since the version your players already have.
The Build Settings window
Open it from Window → Build:
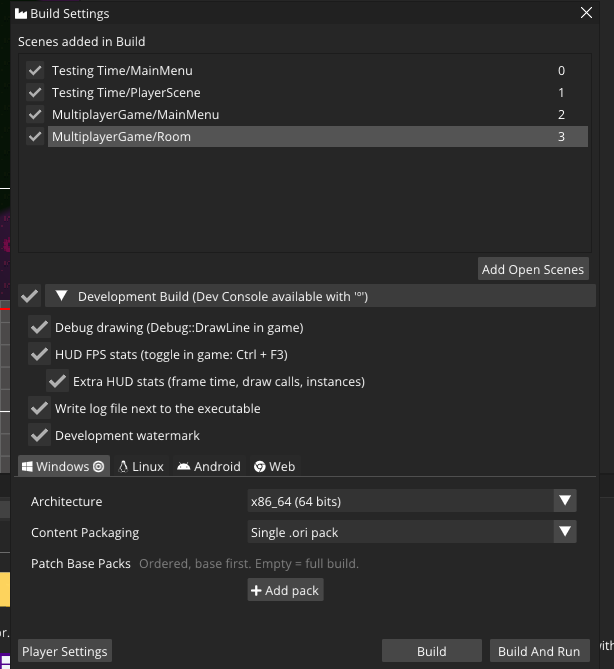
From top to bottom:
- Scenes added in Build — every scene that ships. The checkbox enables/disables a scene, dragging reorders them, and the number on the right is the build index: index
0is the scene your game boots into. Add Open Scenes grabs whatever you have open. - Development Build — turns on the in-game debugging tools: the dev console, debug drawing, on-screen stats and a log file. Leave it off for store builds. The next section breaks these down.
- Platform tabs — Windows / Linux / Android / Web, each with its own settings such as the target Architecture (the active platform is marked). Selecting a different tab shows Switch Platform, which reimports the asset library for that target.
- Player Settings — product name, version, icon and friends.
- Build / Build And Run — the moment of truth.
Development builds & the dev console
Tick Development Build and a whole debugging toolkit ships inside your game. Leave it off for anything you hand to players — release builds drop the tooling, the watermark and the overhead. Its sub-options:
- Development Build (Dev Console available with
º) — the master switch. It enables the in-game dev console, opened at runtime with theºkey (top-left of the keyboard, just belowEsc). - Debug drawing — lets
Debug::DrawLineand friends render in the running game, so you can see raycasts, paths and hitboxes on the real build, not just in the editor. - HUD FPS stats — an FPS + memory overlay you can toggle in-game with Ctrl + F3.
- Extra HUD stats — expands that overlay with frame time, draw calls and instance counts.
- Write log file next to the executable — dumps the run's log to a file beside the game, so you can debug a build on a machine that isn't yours.
- Development watermark — stamps a corner marker so a dev build is never mistaken for a release.
The dev console
Press º in a development build and the console drops down over your game — a live command line into the running build:
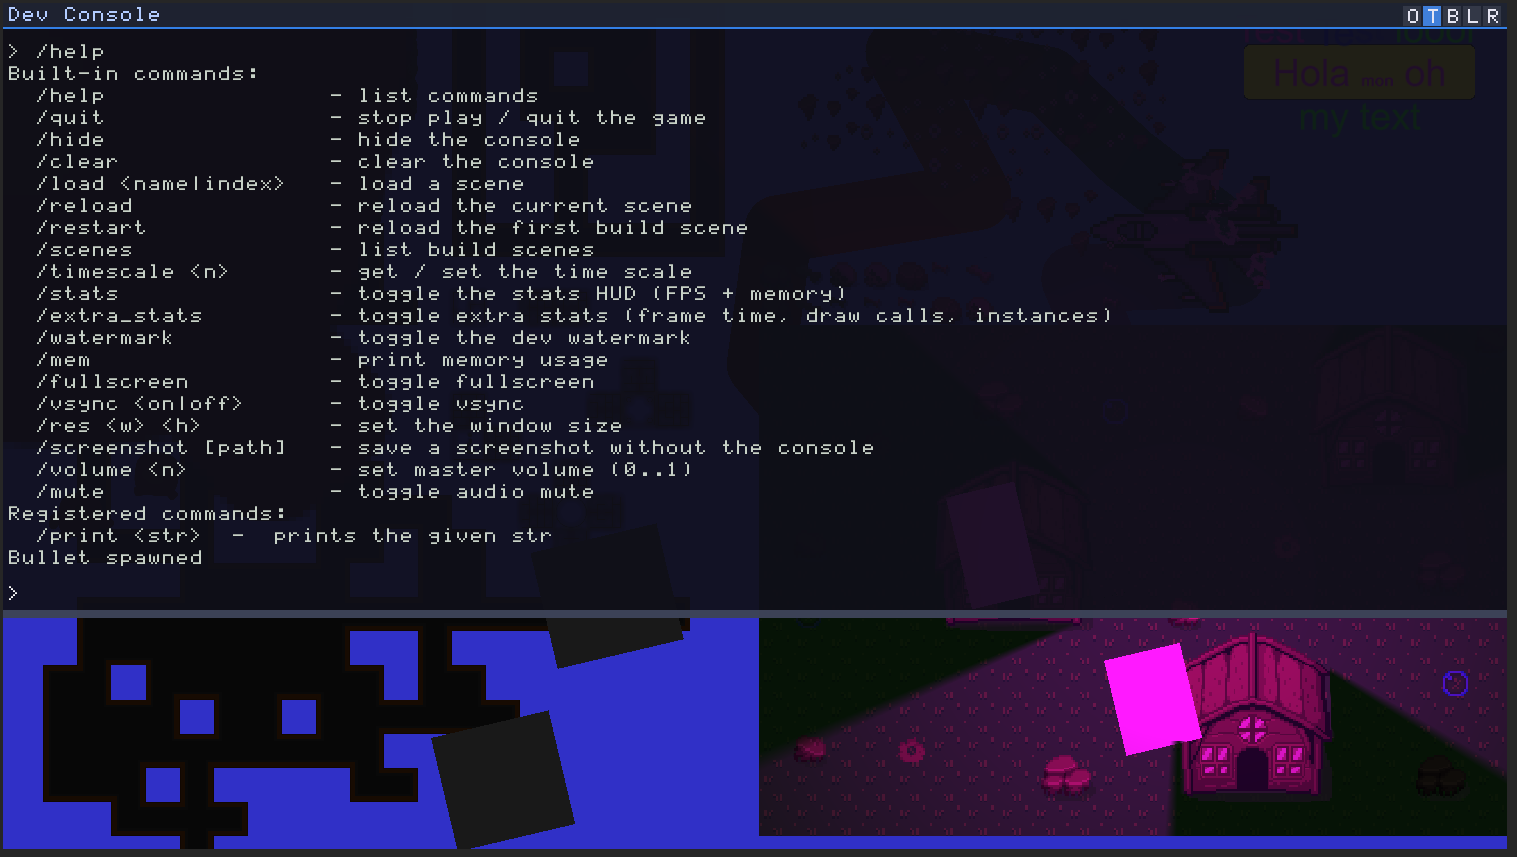
Type /help for the list. The built-ins cover what you reach for constantly while testing:
| Command | What it does |
|---|---|
/help |
List commands. |
/quit |
Stop play / quit the game. |
/hide |
Hide the console. |
/clear |
Clear the console. |
/load <name|index> |
Load a scene by name or build index. |
/reload |
Reload the current scene. |
/restart |
Reload the first build scene. |
/scenes |
List the build scenes. |
/timescale <n> |
Get / set the time scale (0.5 = half speed, 0 = pause). |
/stats |
Toggle the stats HUD (FPS + memory). |
/extra_stats |
Toggle extra stats (frame time, draw calls, instances). |
/watermark |
Toggle the dev watermark. |
/mem |
Print memory usage. |
/fullscreen |
Toggle fullscreen. |
/vsync <on|off> |
Toggle vsync. |
/res <w> <h> |
Set the window size. |
/screenshot [path] |
Save a screenshot without the console in it. |
/volume <n> |
Set master volume (0..1). |
/mute |
Toggle audio mute. |
Registering your own commands
The console is scriptable: register a command from AngelScript and it appears in /help right beside the built-ins. Hand DevConsole::RegisterCommand a name, a help string and a callback that receives the typed arguments:
using namespace CometEngine;

class DebugCommands : CometBehaviour
{
    void Start()
    {
        DevConsole::RegisterCommand("print <str>", "prints the given str",
            CometDelegateStringArray(PrintCommand));
    }

    void PrintCommand(array<string>@ args)
    {
        if (args.length() == 0) return;
        print(args[0]);
    }
}
Now typing /print hello echoes hello in the console. The first word of the name (print) becomes the /print you type; the rest (<str>) is just a usage hint shown by /help. The callback receives the space-separated arguments the player typed, and print(...) writes back into the console. DevConsole::Show(), Hide(), IsShown() and UnregisterCommand("print") round out the API.
Debugging and profiling a dev build
A development build isn't only for print-debugging — the editor can attach its script debugger and profiler to the running build over a local socket. Turn it on in Preferences → Build Debugger:

With Attach to development builds ticked, launch a development build and the editor connects to it automatically on the script debugger port (54711). From there the editor's built-in text editor becomes a full AngelScript debugger for the live build: click the gutter to set breakpoints, then Step Over / Step In / Step Out / Continue through your code while the game runs, inspecting the call stack, local variables and watched expressions in the debugger panels — the same experience as debugging play mode in the editor, except it's the real exported build being driven.
The profiler port (54713) is the other half: it streams timing data from the running build into the editor's profiler, so you can see where each frame actually goes — script functions, draw calls, systems — on real hardware instead of guessing. (You only need to change either port if something else on your machine already uses it.)
What comes out the other side
Comet packs content into .ori archives — a deterministic, binary-indexed format the runtime memory-maps and streams from with zero copies. Every resource is content-hashed, which is what makes patching possible later. The Content Packaging dropdown picks the layout:
| Mode | Result |
|---|---|
Single .ori pack |
The executable plus one .ori file next to it. The usual choice. |
Embedded in executable |
The .ori is appended to the executable — one single file to distribute. |
Loose content folder |
A content/ folder with the raw blobs and manifests — convenient while iterating. |
[!NOTE] Content Packaging is a standalone (Windows/Linux) option. Android and Web decide their own layout: an Android build packs content uncompressed inside the APK so the engine can memory-map it in place, and a Web build produces a static site with the content preloaded or streamed over HTTP (see the platform notes below). The
Single .ori/Embedded/Loosechoice only applies to the desktop executable + pack you ship yourself.
A typical Windows output folder:
MyGame/
├── MyGame.exe
├── MyGame.ori          ← all packed content
├── extra_ori/          ← drop DLC/mod packs here: auto-mounted at boot
└── data/               ← loose files from your Data Assets folder
Anything you place in extra_ori/ is mounted automatically at startup — a zero-code mod and DLC delivery mechanism.
Shipping a patch
Here's the workflow that saves your players from re-downloading gigabytes.
A patch is built against the packs your players already have. In the platform tab you'll find Patch Base Packs:
- Ship version 1.0 — a normal full build. Keep its
MyGame.orisomewhere safe. - Keep developing: fix scenes, swap textures, add a level.
- In the Build window, add the shipped
MyGame.orito Patch Base Packs (for later patches: list the base first, then each prior patch, in order). - Press Build. Comet compares every resource's content hash against the merged base packs and writes
MyGame_patch.oricontaining only what changed — plus tombstones for resources you deleted.
Once the player has the patch file, there are two ways it gets applied, and the difference matters:
- Drop it in the
extra_ori/folder (next to the executable) and it is mounted automatically at startup — no code required. This is the zero-effort path for a launcher or auto-updater: download intoextra_ori/, relaunch, done. - Put it anywhere else and you must mount it yourself from AngelScript with
OriLoader::Mount("path/to/patch.ori")(see below). This is what you want for an in-game "check for updates" button, DLC the player enables in a menu, or a mod loader.
Either way the runtime layers the patch over the base: newer packs shadow older ones, deletions apply, done. Patch metadata records which content version it targets and its sequence number, so out-of-order patches are refused instead of corrupting the game.
[!NOTE] Patches are regular
.oripacks. The same mechanism ships DLC: build a patch that only adds content and sell the file.
Mounting packs at runtime
The OriLoader namespace lets scripts manage packs while the game runs — the foundation for in-game patchers, DLC stores and mod loaders:
using namespace CometEngine;

class PatchManager : CometBehaviour
{
    void ApplyDownloadedPatch(const string &in path)
    {
        Debug::Log("Content version before: " + formatInt(OriLoader::GetContentVersion()));

        if (OriLoader::Mount(path))
        {
            Debug::Log("Patch mounted! Now at version " + formatInt(OriLoader::GetContentVersion()));
            // Resources loaded from now on come from the patch where it shadows the base.
        }
        else
        {
            Debug::Log("Mount failed - wrong engine version or corrupt pack.");
        }
    }

    void ListInstalledContent()
    {
        array<string> packs = OriLoader::GetMountedPacks();
        for (uint i = 0; i < packs.length(); i++)
        {
            Debug::Log("[" + formatInt(int(i)) + "] " + packs[i]);
        }
    }

    void RemoveMod(const string &in path)
    {
        if (OriLoader::IsMounted(path))
        {
            OriLoader::Unmount(path);   // resources revert to the packs below
        }
    }
}
MountWithPriority(path, priority) controls shadowing order explicitly, and App::GetProductVersion() / App::GetEngineVersion() give you the strings for your own update checks.
Platform notes
Android
The Android tab wants your signing setup: Keystore File, Keystore Password, Key Alias, Key Password, plus Min/Target SDK Level and the target Architectures (arm64-v8a by default). Comet generates a Gradle project, builds and signs the APK, and — with a device connected over ADB — Build And Run installs and launches it directly on the phone. Game content is stored uncompressed inside the APK so the engine can memory-map it in place.
Web
The Web tab configures the Canvas Size and responsiveness. The build produces a static site — index.html, the WASM binary, the JS runtime, a service worker and your content:
- Small games preload everything for a hitch-free start; bigger ones preload the boot set and stream the rest.
- The service worker caches content for instant reloads and offline play.
- Patches work over HTTP too:
OriLoader::Mount("https://cdn.example.com/patch_v2.ori").
Remember the platform's limits: no native sockets (use WebSockets — see Networking) and no threads.
Platform macros in AngelScript
Because the same scripts compile for every target, you often need code that only exists on one platform — desktop file dialogs, web-specific networking, editor-only tooling. Comet defines preprocessor macros — for the target platform, and for the build configuration — and you branch on them with #ifdef / #ifndef / #else / #endif:
| Macro | Defined when... |
|---|---|
COMET_STANDALONE |
compiling a Windows or Linux desktop build |
COMET_ANDROID |
compiling an Android build |
COMET_WEB |
compiling a Web (Emscripten/WASM) build |
COMET_EDITOR |
running inside the editor (play mode / edit mode), not an exported build |
COMET_DEVELOPMENT |
running in the editor or a development build — stripped from a shipping build |
COMET_EDITOR is the important one: it's defined while your scripts run in the editor and absent in every exported build. Wrap editor-only helpers, debug shortcuts and test hooks in it so they compile out of the shipped game:
using namespace CometEngine;

class DebugTools : CometBehaviour
{
    void Update()
    {
#ifdef COMET_EDITOR
        // Cheat keys that only exist while developing in the editor.
        if (Input::GetKeyDown(KeyCode::F5)) GiveAllPowerups();
        if (Input::GetKeyDown(KeyCode::F6)) SkipLevel();
#endif
    }

    void OpenSettingsFolder()
    {
#ifdef COMET_STANDALONE
        // Desktop-only: browse to a folder on disk.
        OpenNativeFileBrowser();
#elif defined(COMET_WEB)
        // The browser sandbox has no filesystem — show an in-game panel instead.
        ShowInGameSettings();
#endif
    }
}
The build system also lets you define your own scripting constants per platform in the Player Settings, which appear as additional #ifdef symbols — handy for feature flags (a DEMO build, a CONSOLE variant, and so on).
[!TIP]
COMET_EDITORis true in both edit mode and play mode inside the editor. If you need "only in a real build", use#ifndef COMET_EDITOR. If you need "only on desktop", use#ifdef COMET_STANDALONE.
Development-only code: COMET_DEVELOPMENT
COMET_EDITOR strips code from every exported build — perfect for editor tooling, but too aggressive when you want debug helpers that live in the development builds you hand to testers. That's what COMET_DEVELOPMENT is for: it's defined in the editor and in a development build (the Development Build box), and stripped only from a shipping build. So #ifdef COMET_DEVELOPMENT code behaves identically while you develop in the editor and in the dev build you send out — then vanishes from the release:
using namespace CometEngine;

class DiagnosticsOverlay : CometBehaviour
{
    void Update()
    {
#ifdef COMET_DEVELOPMENT
        // Editor + development builds; compiled out of the shipping game.
        if (Input::GetKeyDown(KeyCode::F8)) ToggleDebugOverlay();
#endif
    }
}
Need the same test at runtime rather than compile time — to flip a flag or log a line without wrapping it in an #ifdef? Debug::IsDevelopmentBuild() returns the identical truth: true in the editor and development builds, false in a shipping build.
if (Debug::IsDevelopmentBuild())
{
    Debug::Log("Development build - verbose diagnostics enabled");
}
Rule of thumb: COMET_EDITOR for editor-only tooling, COMET_DEVELOPMENT (or Debug::IsDevelopmentBuild()) for anything that should run while you develop and in test builds, but never in the game you ship.
Automating builds (CI)
Everything the Build window does is available headless — perfect for nightly builds and release pipelines:
CometEngine.exe --export Windows --path "C:/projects/MyGame" --export-path "C:/builds/win64"
CometEngine.exe --export Web     --path "C:/projects/MyGame" --export-path "C:/builds/web"
--export implies headless mode: the project loads, scripts compile, the seven-step build pipeline runs (compile scripts → setup → runtime resources → scenes → resource filtering → pre-build → pack), progress is printed per step, and the process exits 0 on success or 1 on failure — exactly what your CI wants.
[!TIP] Configure Patch Base Packs in the project once, and your CI produces patch builds automatically: check the previous release's
.oripacks into your release storage and point the project at them.
Pre-flight checklist
- Every scene the game needs is in Scenes added in Build, with the right one at index
0. - Development Build is off for store releases.
- Player Settings: product name, version, icon set.
- Test the built game, not just the editor — packed-content loading and platform quirks only show up there.
- Shipped a build? Archive its
.oripacks. They are the base every future patch is built against.
Where to go next
Congratulations — you shipped! If players report a bug, you're one Patch Base Packs entry away from the fix. Now go back and make the game better: maybe some 2D lighting polish?