Animation & the Animator
Comet's animation stack has two levels. Animation clips keyframe properties over time; the Animator plays those clips through a visual state machine with parameters and transitions — idle to run, run to jump, jump to fall — exactly the workflow you know from big engines, tailored to 2D.
Choosing your tool
| AnimatedSprite | Animator | |
|---|---|---|
| What it does | Cycles through a list of sprites at a fixed FPS | Plays Animation clips through a state machine |
| Can animate | Sprite frames only | Any keyframeable property: transform, sprite, colors, your script fields |
| Logic | Play / Pause / Stop | States, transitions, conditions, parameters, events, state scripts |
| Best for | Torches, coins, simple loops | Characters and anything gameplay-driven |
AnimatedSprite is covered at the end of the Sprite Rendering tutorial. Everything below is about the full pipeline: Animation → AnimatorController → Animator.
Creating an Animation clip
Right-click in the Project panel and choose Create Resource → Animation. Double-click the new asset to open the Animation Timeline panel:
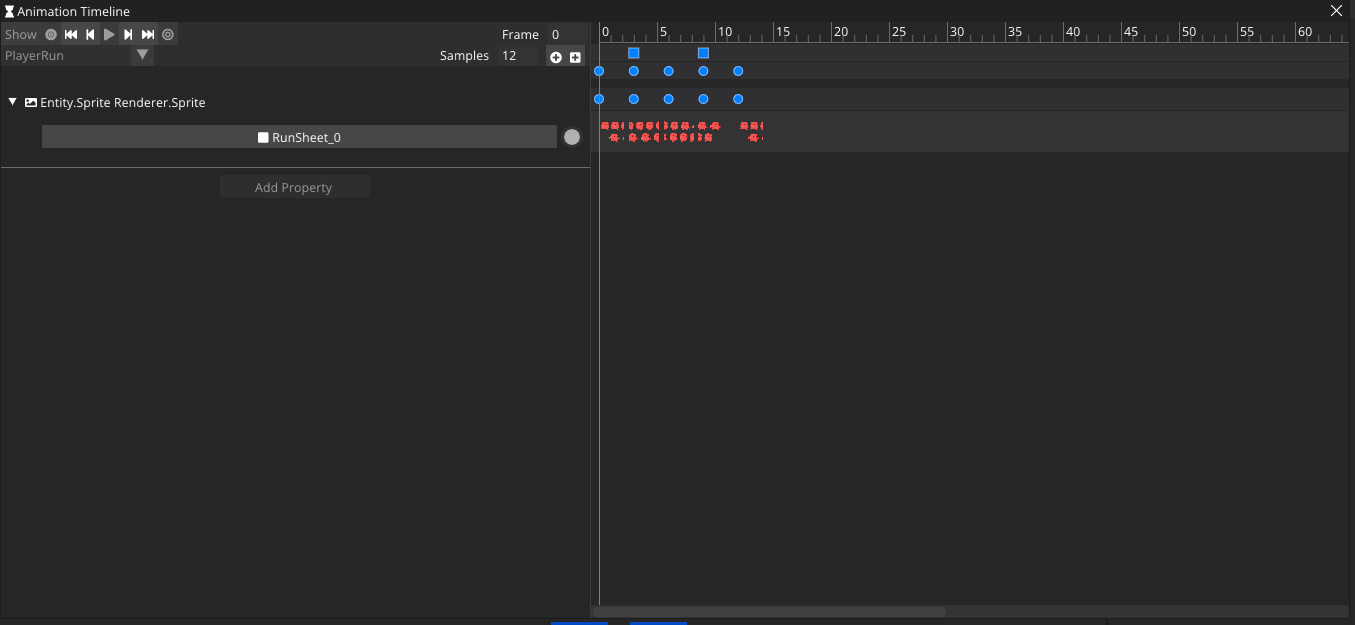
The timeline works the way you'd expect:
- Add Property — pick any animatable property from the behaviours on the target entity:
Transformposition/rotation/scale,SpriteRenderercolor or flips, even public fields of your own scripts. - Move the scrubber to a frame.
- Change the value — in the Inspector or by moving the entity in the scene — and record a keyframe. Keyframes show as diamonds on the track.
- Values between keyframes are interpolated with editable curves.
Clip-level settings live on the Animation resource itself:
- Samples — timeline resolution in frames per second (default 60).
- Loop — whether the clip wraps around or plays once.
lengthis derived from your last keyframe.
Animation events
Keyframes change what the sprite looks like; animation events make things happen at exact moments in the clip. An event calls a method on one of the entity's scripts when playback crosses a specific frame — the reliable way to sync gameplay to animation: a footstep sound on the frame the foot lands, a hitbox spawned on the exact frame of a sword swing, a screen shake when a monster stomps.
In the Animation Timeline, each animated entity has an event track running along the top. To add an event:
- Move the scrubber to the frame where it should fire.
- Right-click the event track (or use its Add Event control) at that frame.
- Pick the target behaviour, the method to call, and fill in any argument values the method takes.
A diamond marker appears on the event track at that frame. The method is just an ordinary function on one of your scripts — no special attribute needed:
using namespace CometEngine;

class Player : CometBehaviour
{
    AudioSample footstepSound;   // assigned in the Inspector

    // Called by the animation event on the foot-plant frames.
    void OnFootstep()
    {
        AudioSource::PlaySingle(footstepSound, 0.6F);
    }

    // Events can pass arguments configured in the timeline.
    void SpawnHitbox(int damage)
    {
        Debug::Log("swing hitbox active for " + damage + " damage");
    }
}
The PlayerRun clip in the screenshot above, for instance, has two OnFootstep events — one on each frame where a foot hits the ground — so the footstep audio stays perfectly in step with the run cycle no matter how the animation's speed is scaled.
[!NOTE] Events fire when playback crosses their frame during normal play. When you
Seek()to scrub the animator deterministically (for a network correction, say), passfireEvents = falseso you don't retrigger sounds and hitboxes while jumping through the timeline.
[!WARNING] An event calls a method by name on the target behaviour. If you rename or remove that method in your script, the event silently stops firing — so keep event-target method names stable, or update the event when you refactor.
Building the state machine
Right-click the Project panel → Create Resource → Animator Controller, then double-click it to open the Animator graph:
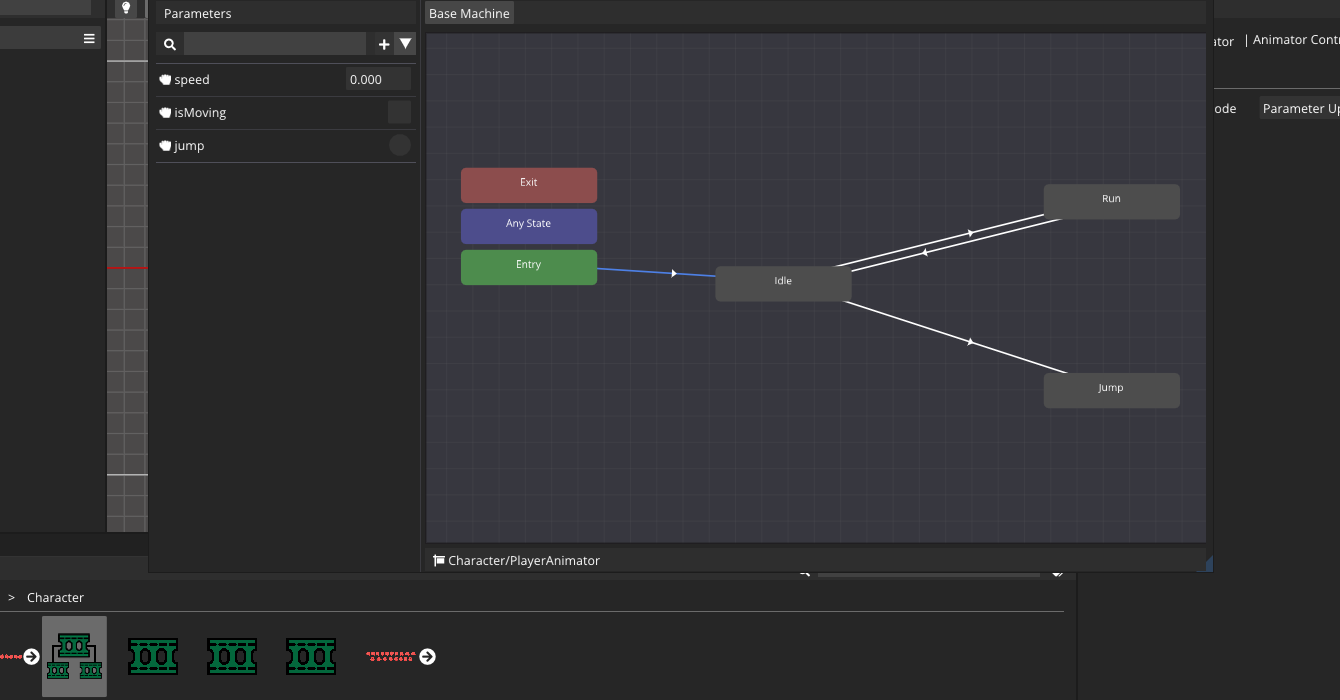
The workflow, end to end:
Create states — right-click the background → Create State. Assign each state an Animation clip and a name (
Idle,Run,Jump...).Pick the entry state — right-click a state → Set as Entry. This is where the machine starts.
Connect them — right-click a state → Create Transition To, then click the target state.
Add parameters — in the Parameters panel, click + Add Parameter and choose a type:
Type Use for FloatContinuous values — speed, aim angle. IntDiscrete values — weapon id, combo step. BoolPersistent flags — grounded, crouching. TriggerOne-shot events — jump, hit. Consumed automatically when a transition uses it. Add conditions to transitions — right-click a transition → Edit Conditions. Combine parameter checks (
speedgreater than0.1,isGroundedis true...); all conditions must pass. Enable Exit Time on a transition to also require the current animation to finish first — ideal for attack chains that must not cut off mid-swing.
For big graphs, group states into sub-state machines (right-click → Create State Machine, double-click to enter). States inside are addressed with a slash path like "Combat/Attack1".
[!TIP] The controller's Conditions Check Mode decides when transitions are evaluated: only when a parameter changes or an animation ends (cheap, default) or every animation update (reactive, a bit costlier).
Playing it on an entity
Select your entity, Add Behaviour → Animator, and drop the controller into the Animator Controller field. Useful inspector options:
- Speed — global playback multiplier for this entity.
- Update Time Mode —
Scaled Time(respectsTimescaling and pauses),Unscaled Time(UI, pause menus) orPhysics Time(sync with FixedUpdate). - Keep State On Disable — when re-enabled, resume where it left off instead of restarting from entry.
Driving the Animator from AngelScript
Your gameplay code never plays clips directly — it feeds parameters and lets the state machine decide:
using namespace CometEngine;

class PlayerAnimation : CometBehaviour
{
    private Animator animator;

    void Start()
    {
        animator = Animator::Get(entity);
    }

    void Update()
    {
        float moveX = 0.0F;
        if (Input::GetKeyPressed(KeyCode::A)) moveX -= 1.0F;
        if (Input::GetKeyPressed(KeyCode::D)) moveX += 1.0F;

        animator.SetFloat("speed", Math::Abs(moveX));
        animator.SetBool("isMoving", moveX != 0.0F);

        if (Input::GetKeyDown(KeyCode::SPACE))
        {
            animator.SetTrigger("jump"); // consumed by the Idle->Jump transition
        }
    }
}
You can also query and force states directly:
// What is playing right now?
AnimatorStateInfo state = animator.GetCurrentState();
if (state !is null)
{
    Debug::Log(state.name + " at " + state.normalizedTime);
}

// Bypass transitions entirely (cutscenes, deaths):
animator.Play("Death", 0.0F);            // state name
animator.Play("Combat/Attack1", 0.0F);   // state inside a sub-machine

// Deterministically scrub to a point in the current state (e.g. after a
// network correction). fireEvents = false skips animation events on the way.
animator.Seek(0.5F, false);
[!TIP]
SetFloat("speed", ...)hashes the parameter name every call. In hot loops, resolve the ID once and reuse it:private uint64 speedId; void Start() { speedId = animator.GetParameterID("speed"); } void Update() { animator.SetFloat(speedId, currentSpeed); }
State machine behaviours
Sometimes logic belongs to a state, not to the entity — "play a sound while in Alert", "enable the hitbox during Attack". Right-click a state → Add Script → AnimatorStateBehaviour and Comet generates a script skeleton for you:
using namespace CometEngine;

class AlertState : AnimatorStateBehaviour
{
    // Called when the animator enters this state.
    void OnStateEnter(Animator animator, AnimatorStateInfo stateInfo)
    {
        Debug::Log(animator.entity.name + " entered " + stateInfo.name);
    }

    // Called every animation update while this state is active.
    void OnStateUpdate(Animator animator, AnimatorStateInfo stateInfo)
    {
    }

    // Called when the animator leaves this state.
    void OnStateExit(Animator animator, AnimatorStateInfo stateInfo)
    {
    }
}
The instance lives as long as the controller is in use, and Awake() / OnDestroy() bracket its lifetime.
Reusing a controller: Animator Overrides
An Animator Controller Override (Create Resource → Animator Controller Override) wraps an existing controller and swaps its clips while keeping every state, transition and parameter. Build the state machine once for "humanoid enemy", then create overrides for the goblin, the skeleton and the knight that only replace the animations:
using namespace CometEngine;

class SkinSwapper : CometBehaviour
{
    void ApplySkin(AnimatorControllerOverride skin)
    {
        Animator::Get(entity).animatorController = skin;
    }
}
From code you can inspect and edit overrides with GetOverride() / SetOverride(original, replacement).
Animator quick reference
| Task | Call |
|---|---|
| Set parameters | SetFloat / SetInt / SetBool (name or id, value) |
| Fire a trigger | SetTrigger("jump"), cancel with ResetTrigger("jump") |
| Read parameters | GetFloat / GetInt / GetBool / GetTrigger |
| Current state | GetCurrentState() → name, fullName, normalizedTime |
| Force a state | Play("StateName", normalizedTime) |
| Scrub deterministically | Seek(normalizedTime, fireEvents) |
| Playback speed | speed property |
| Reset parameters | SetDefaultParameterValues() |
Where to go next
Hook animation parameters to real movement in the Navigation tutorial, or trigger animations across the network in Networking & Multiplayer.