Input Actions: The Input Module
Reading KeyCode::SPACE directly works, but it hard-codes your controls: no rebinding, no clean gamepad support, no "hold to charge" without hand-rolled timers. Comet's Input module fixes all of that. You define named actions — "Jump", "Move", "Fire" — in the editor, bind them to any keys, buttons or sticks you like, and your code just asks the action for its value. Rebinding, deadzones, hold/tap detection and multi-device support all become configuration instead of code.
[!TIP] This is the layer above raw input polling. If you only need a couple of fixed keys, polling is simpler. For a shippable game with gamepad support and remappable controls, use actions.
The model: groups, actions, bindings
Three concepts nest inside each other:
- An Input Group organizes related actions — a
Gameplaygroup, aUIgroup, aVehiclegroup. Groups can be enabled and disabled as a unit, so entering a menu can switch the whole control scheme in one line. - An Input Action is a named intent with a value type:
Button(pressed / not),Axis(a 1-D float, like a throttle) orVector2(a 2-D direction, like movement). - A Binding connects a physical control to an action. One action can have many bindings — that's how Jump answers to both the space bar and the gamepad's A button. Composite bindings combine several controls into one value (four keys → a
Vector2, two keys → an axis).
Configuring actions in the editor
Open Project Settings → Input. This is where the whole scheme is authored:
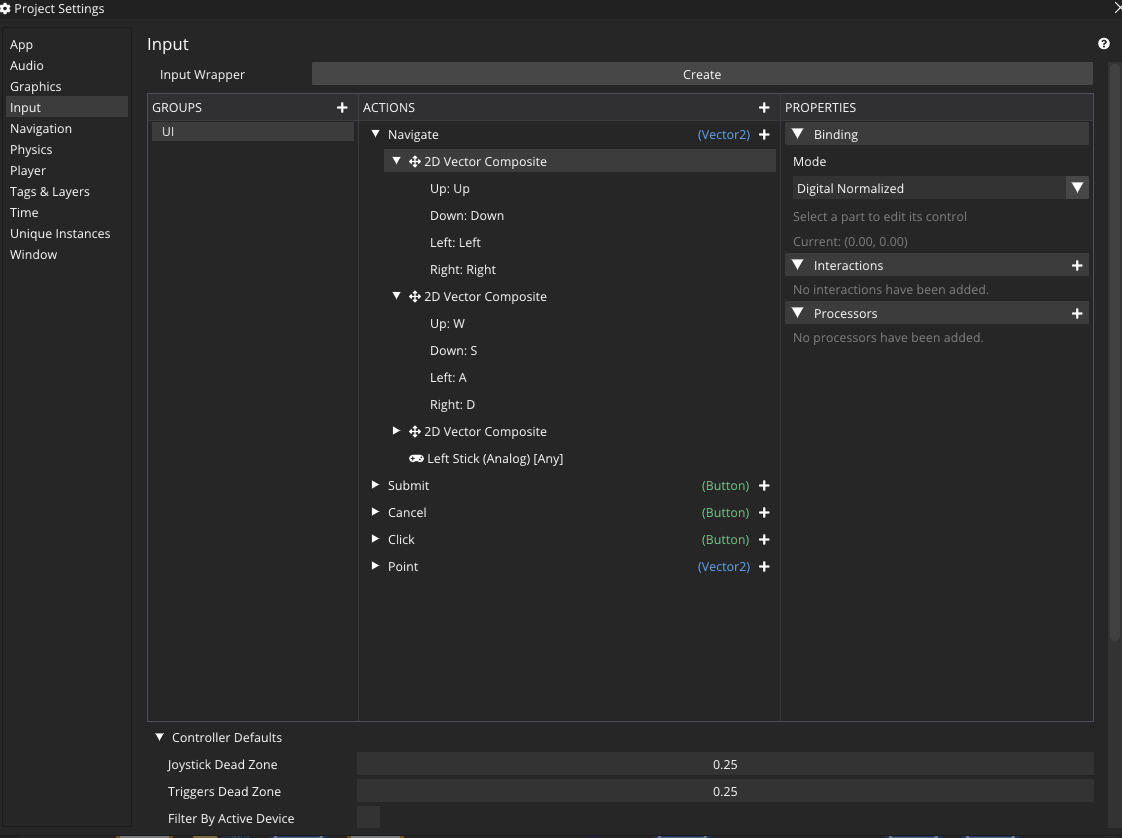
- Add a group (e.g.
Gameplay). - Add actions to it (e.g.
Moveas aVector2,Jumpas aButton) and pick each one's value type. - Add bindings to each action. For
Move, a 2D Vector composite turns W/A/S/D into aVector2; add a second binding for the gamepad's left stick and the action seamlessly accepts either. ForJump, add the space bar and the A button. - Optionally attach processors and interactions (below).
- Save — the scheme is stored with the project.
Processors: shaping the value
A processor post-processes a binding's or action's raw value:
- Deadzone — ignore tiny stick drift below a threshold.
- Invert X / Invert Y — flip an axis (inverted-Y aiming).
- Scale — multiply the value (sensitivity).
- Normalize / Clamp — bound the range.
- Response Curve — ease the input non-linearly, so small stick movements are gentle and large ones ramp up.
Interactions: shaping when it fires
An interaction decides what counts as "performed", so timing-based inputs are configuration, not code:
- Press — fires immediately (the default).
- Hold — fires after the control is held for a set time (hold to charge, hold to interact).
- Tap — fires on a quick press-and-release.
- Slow Tap / Multi-Tap — deliberate presses, or double/triple taps (double-tap to dash).
Reading actions from AngelScript
Fetch a group by name, pull out its actions, and read them. The value-type getters mirror the raw polling verbs:
using namespace CometEngine;
using namespace CometEngine::InputSettings;

class PlayerController : CometBehaviour
{
    private InputAction moveAction;
    private InputAction jumpAction;

    void Start()
    {
        InputGroup group = InputSettings::GetGroupByName("Gameplay");
        if (group !is null)
        {
            moveAction = group.GetActionByName("Move");
            jumpAction = group.GetActionByName("Jump");
        }
    }

    void Update()
    {
        // One Vector2, whether it came from WASD or the left stick.
        if (moveAction !is null)
        {
            Vector2 move = moveAction.GetVector2();
            transform.Translate(move * 5.0F * Time::GetDeltaTime(), Space::World);
        }

        // wasPressedThisFrame is the action-system GetKeyDown.
        if (jumpAction !is null && jumpAction.wasPressedThisFrame)
        {
            Jump();
        }
    }

    void Jump() { }
}
The state accessors:
| Accessor | Equivalent raw verb |
|---|---|
isPressed |
GetKeyPressed (held) |
wasPressedThisFrame |
GetKeyDown (press edge) |
wasReleasedThisFrame |
GetKeyUp (release edge) |
GetBool() / GetFloat() / GetVector2() |
typed value read |
phase (IDLE / STARTED / PERFORMED) exposes the interaction state machine when you need it.
Callbacks instead of polling
For fire-and-forget events, subscribe to an action's signals rather than checking it every frame:
using namespace CometEngine;
using namespace CometEngine::InputSettings;

class WeaponController : CometBehaviour
{
    void Start()
    {
        InputGroup group = InputSettings::GetGroupByName("Gameplay");
        InputAction fire = group.GetActionByName("Fire");
        if (fire !is null)
        {
            fire.onStarted.Add(InputActionCallback(OnFireStarted));
            fire.onCancelled.Add(InputActionCallback(OnFireReleased));
        }
    }

    void OnFireStarted(InputAction action)   { Debug::Log("fire down"); }
    void OnFireReleased(InputAction action)  { Debug::Log("fire up"); }
}
onStarted, onPerformed and onCancelled fire once per state transition — ideal for hold/charge weapons where you care about the edges, not every frame in between.
The generated InputWrapper
Typing action names as strings is error-prone. The editor can generate a typed InputWrapper for your groups, so you can reach any action with autocompletion and no string lookups:
// Generated from the editor's Input settings:
Vector2 move = InputWrapper::Gameplay.Move.GetVector2();
if (InputWrapper::Gameplay.Jump.wasPressedThisFrame) Jump();
Generating it: at the top of the Project Settings → Input panel, next to Input Wrapper, click Create. Comet writes an InputWrapper script with a typed accessor for every group and action, which you can then use anywhere in your code.
[!IMPORTANT] The wrapper is generated code — a snapshot of your scheme, not a live view of it. Every time you add, remove or rename a group or action, regenerate it by clicking the refresh button (the Create control becomes a refresh once the wrapper exists). Skip this and the wrapper drifts out of sync — a renamed action still exposes its old name, and a new one won't appear at all.
Under the hood the wrapper simply caches GetGroupByName / GetActionByName for you (exactly the pattern shown above), but you get compile-time names and IDE completion for free.
Switching schemes with groups
Because groups enable and disable as a unit, swapping control contexts is trivial:
using namespace CometEngine::InputSettings;

void OpenPauseMenu()
{
    InputSettings::GetGroupByName("Gameplay").enabled = false;
    InputSettings::GetGroupByName("UI").enabled = true;
}
Now Gameplay actions go quiet while the pause menu is up, and the UI group's Navigate/Submit/Cancel take over — no flags threaded through your gameplay code.
The Input Debugger
When a binding "doesn't fire" or a stick reads the wrong axis, open Window → Input Debugger. It lists every group and action with its value type, live phase, and current value, updating in real time — so you can watch an action light up as you press the key and confirm the binding is wired the way you think.
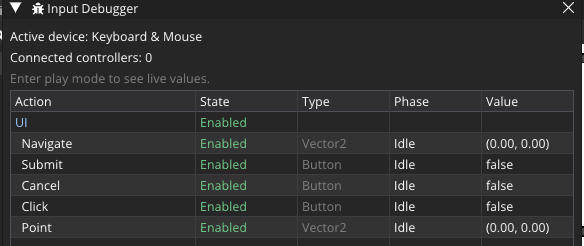
At the top it also shows the active device (Keyboard & Mouse or Gamepad) and the number of connected controllers. Live values appear once you enter play mode — in edit mode it prompts you to press Play.
[!NOTE] The Input Debugger is the fastest way to diagnose input problems: if the action doesn't react here, the binding is wrong (fix it in Project Settings); if it does react here but not in your game, the bug is in your script.
Where to go next
Drive a character with actions and Physics, or wire the UI group's Navigate/Submit into your menus.