Visual Scripting with Node Graphs
Not every piece of logic wants to be code. Dialogue trees, quest steps, cutscene sequencing, simple AI — these read beautifully as a node graph: boxes wired together, execution flowing along the wires. Comet's node graph system runs graphs on entities via a Graph Updater, and — uniquely — lets you write your own nodes in AngelScript.
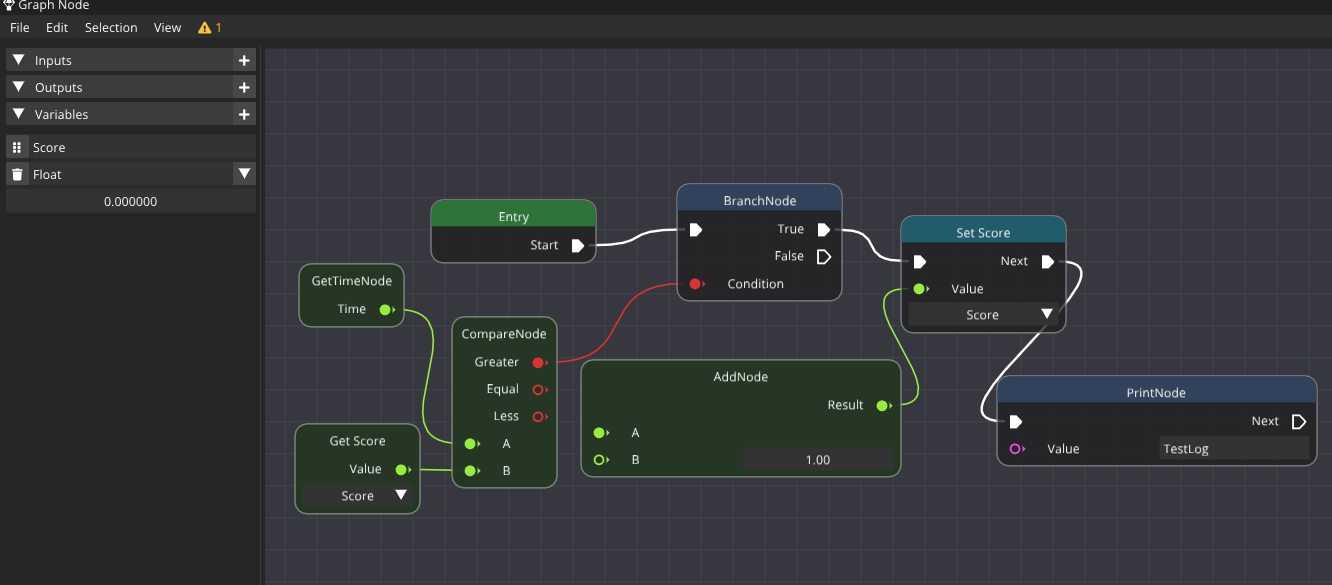
How a graph runs
A graph starts at an implicit Entry node and flows along flow wires (white) from one flow node to the next. Before a node runs, its data inputs are pulled from upstream pure nodes (stateless little calculators — Add, Compare, Get Time) along data wires (coloured). Variables carry state, and a graph can expose inputs and outputs that your game code reads and writes.
There are two kinds of node:
- Flow nodes — sit on the execution path. They can take time, branch, or loop. A flow node returns an
ExecutionResultnaming which output to continue along. - Pure nodes — compute output values from inputs on demand, with no side effects. They're evaluated (and memoized) whenever a flow node needs their result.
Running a graph on an entity
Add a Graph Updater behaviour, assign it a graph, and it runs a private copy of that graph (the asset itself is never mutated). Your code feeds the graph its inputs and reads its outputs by variable name:
using namespace CometEngine;

class QuestRunner : CometBehaviour
{
    void Start()
    {
        GraphUpdater updater = GraphUpdater::Get(entity);

        // Push inputs into the graph...
        updater.SetInputFloat("playerLevel", 7.0);
        updater.SetInputBool("hasKey", true);
        updater.Start();
    }

    void Update()
    {
        GraphUpdater updater = GraphUpdater::Get(entity);
        if (!updater.isRunning)
        {
            // ...and read what it produced.
            Debug::Log("reward: " + updater.GetOutputInt("goldReward"));
        }
    }
}
SetInputBool/Int/Float/String/Vector2/Vector3 push values in; GetOutputBool/Int/Float/... read them back; Start() / Stop() and isRunning control the run. When a graph finishes, its End Update Action can restart it, disable the behaviour, or destroy the entity.
Writing your own nodes in AngelScript
This is the powerful part: a node is just an AngelScript class with attributes. Pure nodes override Evaluate and declare [Input]/[Output] fields:
using namespace CometEngine;
using namespace CometEngine::GraphNode;

[GraphNodeMenuItem("Math/Add")]
class AddNode : PureNode
{
    [Input] float a;
    [Input] float b;
    [Output] float result;

    void Evaluate(GraphNode graph)
    {
        result = a + b;
    }
}
Flow nodes declare their output pins in the constructor with super({...}) and return an ExecutionResult naming the pin to continue along. A branch:
using namespace CometEngine;
using namespace CometEngine::GraphNode;

[GraphNodeMenuItem("Flow/Branch")]
class BranchNode : FlowNode
{
    [Input] bool condition;

    BranchNode()
    {
        super({"True", "False"});   // two flow outputs
    }

    ExecutionResult OnExecute(GraphNode graph)
    {
        return ExecutionResult(condition ? "True" : "False");
    }
}
A flow node can also span multiple frames — return an empty ExecutionResult() to stay on the node and be called again next frame. That's how a Delay node works:
using namespace CometEngine;
using namespace CometEngine::GraphNode;

[GraphNodeMenuItem("Flow/Delay")]
[NodeColor(0.2, 0.2, 0.5)]
class DelayNode : FlowNode
{
    [Input] float delaySeconds = 1.0F;
    private float startTime = 0.0F;

    DelayNode()
    {
        super({"Next"});
    }

    void OnExecuteStart(GraphNode graph)
    {
        startTime = Time::GetGameTime();
    }

    ExecutionResult OnExecute(GraphNode graph)
    {
        if (Time::GetGameTime() - startTime >= delaySeconds)
        {
            return ExecutionResult("Next");   // move on
        }
        return ExecutionResult();             // wait, retry next frame
    }
}
The attributes are the glue:
[GraphNodeMenuItem("Path/Name")]— registers the node in the graph editor's right-click Add Node menu under that path. Required.[Input]/[Output]— mark fields as data pins. Supported types:bool,int,uint,int64,uint64,float,string,Vector2,Vector3, and object handles.[NodeColor(r, g, b)]— an optional header colour.
Pure nodes can even resolve inputs lazily — override ResolveInputsManually() to return true and call ResolveInput(graph, "pinName") only for the branch you actually take, so an expensive or side-effecting upstream node on the path not chosen never runs.
Authoring a graph in the editor
- Create a graph object in the Project panel, then double-click to open the graph editor.
- Right-click the canvas to add nodes from your
[GraphNodeMenuItem]menu. - Drag from a flow output to the next node's flow input (white wires); drag from an
[Output]pin to an[Input]pin (coloured wires). - Add variables, inputs and outputs in the side panel — those inputs/outputs are the contract your
GraphUpdatercode talks to. - Drop a Graph Updater on an entity and assign the graph.
[!NOTE] Data-flow cycles (a pure node feeding itself) are detected and reported; flow loops are allowed and intentional. The runtime always executes a clone of the asset, so a running graph never corrupts the source.
Where to go next
Node graphs pair naturally with everything else — kick one off from an input action, have it move a platform along a Bézier path, or drive an animator from its outputs.